How to clean and maintain an automatic incubator for longevity?
Essential Care Guidelines for Your Automatic Incubation System
Maintaining an automatic incubator is crucial for ensuring successful hatching rates and extending the equipment's lifespan. A well-maintained automatic incubator not only provides optimal conditions for embryo development but also represents a significant investment in your breeding operation. This comprehensive guide will walk you through the essential steps and best practices for keeping your automatic incubator in prime condition.
Fundamental Cleaning Protocols
Daily Cleaning Requirements
The cornerstone of proper automatic incubator maintenance lies in consistent daily cleaning routines. Start by removing any debris, broken eggshells, or dust from the incubator floor. Wipe down the interior surfaces with a clean, slightly damp cloth to prevent the accumulation of dirt. Pay special attention to the corners and edges where debris tends to collect. The humidity tray should be checked and refilled with clean, fresh water daily to maintain optimal moisture levels.
Temperature and humidity sensors require particular attention during daily cleaning. Gently wipe these components with a soft, dry cloth to ensure accurate readings. Avoid using harsh cleaning agents that might damage the sensitive electronic components or leave harmful residues that could affect the developing embryos.
Deep Cleaning Procedures
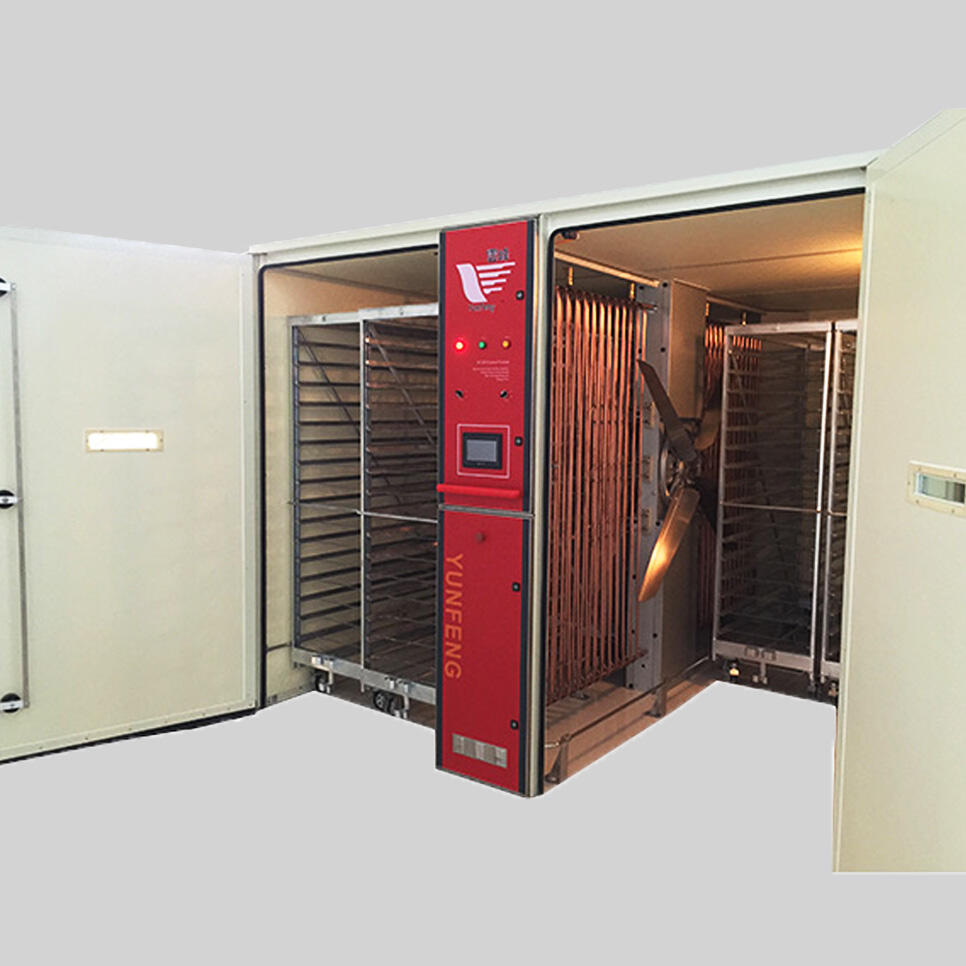
A thorough deep cleaning should be performed between batches or at least every three months. Begin by disconnecting the automatic incubator from its power source. Remove all removable parts, including trays, turning racks, and humidity containers. These components should be washed separately using warm water and a mild disinfectant specifically approved for incubator use.
The interior surfaces require special attention during deep cleaning. Use a solution of warm water and approved sanitizer to clean all surfaces, ensuring you reach every corner and crevice. The ventilation holes and fan assemblies should be carefully cleaned to prevent blockages that could affect air circulation. Allow all components to dry completely before reassembly.
Mechanical Maintenance Essentials
Egg Turning Mechanism Care
The egg turning mechanism in your automatic incubator plays a vital role in successful hatching. Regular inspection of the turning system should be conducted weekly. Check for smooth operation and listen for any unusual sounds that might indicate wear. Lubricate moving parts according to the manufacturer's specifications, using only food-grade lubricants that won't harm developing embryos.
If you notice any irregularities in the turning mechanism, address them promptly. This might include tightening loose components, replacing worn parts, or adjusting the turning angle. Regular maintenance of this system helps prevent costly breakdowns and ensures consistent turning throughout the incubation period.
Temperature Control System Maintenance
The temperature control system requires regular calibration and verification. Use a reliable secondary thermometer to cross-check the incubator's temperature readings at least weekly. Clean the temperature probe carefully and ensure it remains properly positioned within the incubation chamber. Inspect heating elements for signs of wear or damage, and verify that temperature fluctuations remain within acceptable ranges.
The electronic control panel should be protected from moisture and dust. Regular inspection of wiring connections helps prevent potential issues before they affect incubation performance. Document temperature readings and any adjustments made to maintain accurate records of system performance.
Environmental Control Optimization
Humidity Management Techniques
Proper humidity control is essential for successful incubation. Clean and sanitize humidity trays weekly, removing any mineral deposits or algae growth. Use distilled water when possible to minimize mineral buildup on sensors and surfaces. Monitor humidity levels daily and adjust water levels as needed to maintain optimal conditions throughout the incubation period.
Consider installing a backup humidity monitoring system to ensure accurate readings. Regular cleaning of humidity sensors and vents helps maintain precise control over moisture levels. Keep detailed records of humidity readings and any adjustments made to help identify patterns or potential issues.
Ventilation System Upkeep
The ventilation system in your automatic incubator requires regular attention to function properly. Clean air vents and fans monthly, removing any dust or debris that could restrict airflow. Check that all fans operate smoothly and quietly, as unusual sounds may indicate bearing wear or mechanical issues. Ensure that air circulation remains consistent throughout the incubation chamber.
Test the automatic ventilation controls regularly to verify proper operation. Clean or replace air filters according to the manufacturer's schedule. Proper ventilation maintenance helps maintain optimal oxygen levels and prevents the buildup of harmful gases during incubation.
Preventive Maintenance Schedule
Regular Inspection Routines
Develop a comprehensive inspection schedule for your automatic incubator. Include daily visual checks of all systems, weekly testing of mechanical components, and monthly detailed inspections of electronic systems. Document all inspections and maintain detailed records of any issues found or repairs made.
Create a checklist that covers all critical components and systems. This should include temperature and humidity controls, turning mechanisms, ventilation systems, and electronic displays. Regular inspections help identify potential problems before they affect incubation results.
Long-term Maintenance Planning
Establish a long-term maintenance plan that includes scheduled parts replacement and professional servicing. Keep an inventory of common replacement parts to minimize downtime when repairs are needed. Plan major maintenance activities around your breeding schedule to avoid disrupting incubation cycles.
Consider implementing a preventive maintenance program that includes regular professional inspections and servicing. This proactive approach helps extend the life of your automatic incubator and ensures consistent performance throughout its operational life.
Frequently Asked Questions
What cleaning products are safe to use in an automatic incubator?
Use only mild, approved disinfectants specifically designed for incubator cleaning. Avoid harsh chemicals, bleach, or abrasive cleaners that could damage surfaces or leave harmful residues. Always rinse thoroughly with clean water and allow surfaces to dry completely before use.
How often should temperature and humidity sensors be calibrated?
Calibrate temperature and humidity sensors at least every three months or whenever you notice inconsistent readings. Compare readings with reliable secondary instruments and adjust as needed. Professional calibration may be required annually or if significant discrepancies are observed.
When should professional servicing be scheduled for an automatic incubator?
Schedule professional servicing annually or after every 2-3 intensive use cycles. Additional servicing may be needed if you notice unusual operation, inconsistent performance, or after any major component replacement. Regular professional maintenance helps ensure optimal performance and longevity of your equipment.
Essential Care Guidelines for Your Automatic Incubation System
Maintaining an automatic incubator is crucial for ensuring successful hatching rates and extending the equipment's lifespan. A well-maintained automatic incubator not only provides optimal conditions for embryo development but also represents a significant investment in your breeding operation. This comprehensive guide will walk you through the essential steps and best practices for keeping your automatic incubator in prime condition.
Fundamental Cleaning Protocols
Daily Cleaning Requirements
The cornerstone of proper automatic incubator maintenance lies in consistent daily cleaning routines. Start by removing any debris, broken eggshells, or dust from the incubator floor. Wipe down the interior surfaces with a clean, slightly damp cloth to prevent the accumulation of dirt. Pay special attention to the corners and edges where debris tends to collect. The humidity tray should be checked and refilled with clean, fresh water daily to maintain optimal moisture levels.
Temperature and humidity sensors require particular attention during daily cleaning. Gently wipe these components with a soft, dry cloth to ensure accurate readings. Avoid using harsh cleaning agents that might damage the sensitive electronic components or leave harmful residues that could affect the developing embryos.
Deep Cleaning Procedures
A thorough deep cleaning should be performed between batches or at least every three months. Begin by disconnecting the automatic incubator from its power source. Remove all removable parts, including trays, turning racks, and humidity containers. These components should be washed separately using warm water and a mild disinfectant specifically approved for incubator use.
The interior surfaces require special attention during deep cleaning. Use a solution of warm water and approved sanitizer to clean all surfaces, ensuring you reach every corner and crevice. The ventilation holes and fan assemblies should be carefully cleaned to prevent blockages that could affect air circulation. Allow all components to dry completely before reassembly.
Mechanical Maintenance Essentials
Egg Turning Mechanism Care
The egg turning mechanism in your automatic incubator plays a vital role in successful hatching. Regular inspection of the turning system should be conducted weekly. Check for smooth operation and listen for any unusual sounds that might indicate wear. Lubricate moving parts according to the manufacturer's specifications, using only food-grade lubricants that won't harm developing embryos.
If you notice any irregularities in the turning mechanism, address them promptly. This might include tightening loose components, replacing worn parts, or adjusting the turning angle. Regular maintenance of this system helps prevent costly breakdowns and ensures consistent turning throughout the incubation period.
Temperature Control System Maintenance
The temperature control system requires regular calibration and verification. Use a reliable secondary thermometer to cross-check the incubator's temperature readings at least weekly. Clean the temperature probe carefully and ensure it remains properly positioned within the incubation chamber. Inspect heating elements for signs of wear or damage, and verify that temperature fluctuations remain within acceptable ranges.
The electronic control panel should be protected from moisture and dust. Regular inspection of wiring connections helps prevent potential issues before they affect incubation performance. Document temperature readings and any adjustments made to maintain accurate records of system performance.
Environmental Control Optimization
Humidity Management Techniques
Proper humidity control is essential for successful incubation. Clean and sanitize humidity trays weekly, removing any mineral deposits or algae growth. Use distilled water when possible to minimize mineral buildup on sensors and surfaces. Monitor humidity levels daily and adjust water levels as needed to maintain optimal conditions throughout the incubation period.
Consider installing a backup humidity monitoring system to ensure accurate readings. Regular cleaning of humidity sensors and vents helps maintain precise control over moisture levels. Keep detailed records of humidity readings and any adjustments made to help identify patterns or potential issues.
Ventilation System Upkeep
The ventilation system in your automatic incubator requires regular attention to function properly. Clean air vents and fans monthly, removing any dust or debris that could restrict airflow. Check that all fans operate smoothly and quietly, as unusual sounds may indicate bearing wear or mechanical issues. Ensure that air circulation remains consistent throughout the incubation chamber.
Test the automatic ventilation controls regularly to verify proper operation. Clean or replace air filters according to the manufacturer's schedule. Proper ventilation maintenance helps maintain optimal oxygen levels and prevents the buildup of harmful gases during incubation.
Preventive Maintenance Schedule
Regular Inspection Routines
Develop a comprehensive inspection schedule for your automatic incubator. Include daily visual checks of all systems, weekly testing of mechanical components, and monthly detailed inspections of electronic systems. Document all inspections and maintain detailed records of any issues found or repairs made.
Create a checklist that covers all critical components and systems. This should include temperature and humidity controls, turning mechanisms, ventilation systems, and electronic displays. Regular inspections help identify potential problems before they affect incubation results.
Long-term Maintenance Planning
Establish a long-term maintenance plan that includes scheduled parts replacement and professional servicing. Keep an inventory of common replacement parts to minimize downtime when repairs are needed. Plan major maintenance activities around your breeding schedule to avoid disrupting incubation cycles.
Consider implementing a preventive maintenance program that includes regular professional inspections and servicing. This proactive approach helps extend the life of your automatic incubator and ensures consistent performance throughout its operational life.
Frequently Asked Questions
What cleaning products are safe to use in an automatic incubator?
Use only mild, approved disinfectants specifically designed for incubator cleaning. Avoid harsh chemicals, bleach, or abrasive cleaners that could damage surfaces or leave harmful residues. Always rinse thoroughly with clean water and allow surfaces to dry completely before use.
How often should temperature and humidity sensors be calibrated?
Calibrate temperature and humidity sensors at least every three months or whenever you notice inconsistent readings. Compare readings with reliable secondary instruments and adjust as needed. Professional calibration may be required annually or if significant discrepancies are observed.
When should professional servicing be scheduled for an automatic incubator?
Schedule professional servicing annually or after every 2-3 intensive use cycles. Additional servicing may be needed if you notice unusual operation, inconsistent performance, or after any major component replacement. Regular professional maintenance helps ensure optimal performance and longevity of your equipment.


